Posts

Showing posts from 2019

E-Books and free resources

E-Books and free resources E-Books and tutorials for Fiber Channel Protocol (FC) E-Books and tutorials for iSCSI Protocol E-Books and tutorials for NVMe over FC E-Books and tutorials for Linux Kernel Architecture: Linux_Kernel_Architecture Linux.Kernel.Development.Second.Edition Linux Kernel Storage Sub Systems OReilly.Understanding.the.Linux.Kernel.3rd.Edition Understanding_The_Linux_Kernel-3rd_Edition Linux Shell Scripting Ebooks and resources for testing: Software testing Linux Operating System intro and basics Kernel Architecture Docker Basics and Intro Storage Concepts FC Protocol iSCSI Protocol e.t.c.
Python E-Books

Python E-Books and Resources Automate_the_Boring_Stuff_with_Python_(2015) Beginners_Python_Cheat_Sheet Beginning_Programming_in_Python_Dummies Beginning_Python_for_dummies Beginning_Python_Programmer2Programmer Comprehensive_Python_Cheatsheet Learning_Python_OREILLY Learn_Python3_the_hard_way Mastering_Python_Regular_Expressions PANDAS-Reading_and_Writing_Data programiz-python-tutorial Python_for_Data_Science Python_Programming_for_the_Absolute_Beginner-3rd_Edition Python_Projects Python_Testing_Cookbook python-cheat-sheet Python3-TutorialsPoint PythonRegularExpressionsCheatSheet Python_Notes_For_Professionals Python Tutorial Test_Driven_Development_with_Python By Harry_J_W_Percival

Setting up private registry for docker images

The registry is a stateless and highly scalable server-side open source application permissive under Apache license, which let you store your images privately and makes internal distribution and management easy. In case you don't want private registry docker hub is the best place to store your images. To configure own private registry follow below steps: 1. To start the registry container, which will be used as local registry on the docker host: [root@localhost ~]# docker run -d -p 5000:5000 --restart=always --name registry -v /local_registry/images:/var/lib/registry registry:2 Unable to find image 'registry:2' locally 2: Pulling from library/registry c87736221ed0: Pull complete 1cc8e0bb44df: Pull complete 54d33bcb37f5: Pull complete e8afc091c171: Pull complete b4541f6d3db6: Pull complete Digest: sha256:77a8fb00c00b99568772a70f0863f6192ff2635e4af4e22e4d9c622edeb5f2de Status: Downloaded newer image for registry:2 97f0845f8c3a0064ef0144aba57610e4c4f3d79947ee

Unable to pull images from docker hub in your environment ?

A couple of days back I faced an issue where I was able to pull images from docker hub on my laptop when connecting from my home and same was failing when connecting in office. I tried setting a proxy on my RHEL OS with "export" env setting but still, it didn't work. Then after googling figured out the exact root cause. Setting up proxy on OS environment (using export with RHEL) is not enough in case of docker, here you need to set proxy on one more level i.e. on docker settings. To do this follow the below steps: Create a new file "http-proxy.conf" if not exists in the below folder with shown contents: [root@localhost ~]# vi /etc/systemd/system/docker.service.d/http-proxy.conf [Service] Environment="HTTP_PROXY=http://proxy1.localnet.net:8080/" Environment="HTTPS_PROXY=http://proxy1.localnet.net:8080/" save and quit. Restart docker service: [root@localhost ~]# systemctl daemon-reload [root@localhost ~]# systemctl restart do

Preparing RHEL 7.5 base image for docker container from scratch

Whenever we start working with a container, to start you need a base image for any specific Operating system as per your requirement. You can get base images for many OS distributions except RHEL OS as it needs licensing. So in case, you want to prepare a base image of RHEL operating system you can follow below steps which are pretty straight forward:  Prerequisites: Mount RHEL 7.5 ISO on /mnt and create a .repo file: [root@localhost yum.repos.d]# cat /etc/yum.repos.d/local.repo [localrepo] name=Local Repository baseurl=file:///mnt gpgcheck=0 enabled=1 OPTIONAL: HTTP/HTTPS repository is needed when you need to install any packages inside a container, or while preparing containers. [root@localhost yum.repos.d]# cat httplocal.repo [rhel-core] name=RHEL 7.5 Core baseurl=http://web1.repo.local/linux/RedHat/7.5Server/en/os/x86_64/ gpgcheck=0 enabled=1 OPTIONAL: Set proxy if needed in your network. Steps to create a base image: [

How to disable system reboot using “Alt+Ctrl+Del” combination in CentOS/RHEL 7

In CentOS/RHEL operating systems, pressing "Ctrl + Alt + Del" key combination by default initiates a system reboot without any user confirmation. In case if you want to disable this behavior you can run below command: [root@localhost ~]# systemctl mask ctrl-alt-del.target OR [root@localhost ~]# ln -sf /dev/null /etc/systemd/system/ctrl-alt-del.target Now you can try pressing "Ctrl + Alt + Del" key combination and you will see instead of rebooting system it will log below messages to log file " /var/log/messages ": May 18 13:16:07 localhost systemd: Received SIGINT. May 18 13:16:07 localhost systemd: Failed to enqueue ctrl-alt-del.target job: Unit is masked. To enable "Ctrl + Alt + Del" key combination for system reboot: [root@localhost ~]#  systemctl unmask ctrl-alt-del.target

How to monitor disk performance on RHEL or CentOS 7 ?

Image
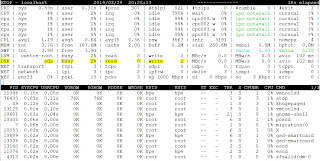
How to monitor disk performance on RHEL or CentOS 7 ? iotop : Watches I/O usage information output by the Linux kernel (requires 2.6.20 or later) and displays a table of current I/O usage by processes or threads on the system. At least the CONFIG_TASK_DELAY_ACCT, CONFIG_TASK_IO_ACCOUNTING, CONFIG_TASKSTATS and CONFIG_VM_EVENT_COUNTERS options need to be enabled in your Linux kernel build configuration. iotop displays columns for the I/O bandwidth read and written by each process/thread during the sampling period. It also displays the percentage of time the thread/process spent while swapping in and while waiting on I/O. For each process, its I/O priority (class/level) is shown. [root@localhost ~]# iotop Total DISK READ :       0.00 B/s | Total DISK WRITE :       0.00 B/s Actual DISK READ:       0.00 B/s | Actual DISK WRITE:       0.00 B/s    TID  PRIO  USER     DISK READ  DISK WRITE  SWAPIN     IO>    COMMAND  14856 be/4 root        0.00 B/s    0.00 B/s  0.00 %

How to add more swap space by adding new swap partition in RHEL or CentOS 7 ?

How to add more swap space by adding new swap partition in RHEL or CentOS 7 What is swap? Swap space on a disk is used when the amount of physical RAM is full in the Linux system. When the system runs out of RAM, inactive pages are moved from the RAM to the swap space. Swap space can be either a dedicated swap partition or a swap file. So here we will see how you can add more swap space as a swap file. In this article we will see how we can add more swap space using a new swap partition. Steps : Let's check how much swap is available on the system currently: [root@localhost ~]# swapon --show [root@localhost ~]# free -h I have a new 10GB disk named "/dev/sdb" and i want to use it as a swap space. [root@localhost ~]# fdisk -l Disk /dev/sdb: 10.7 GB, 10737418240 bytes, 20971520 sectors Units = sectors of 1 * 512 = 512 bytes Sector size (logical/physical): 512 bytes / 512 bytes I/O size (minimum/optimal): 512 bytes / 512 bytes Step 1 : Create a

How to add more swap space as a swapfile on RHEL or CentOS 7 ?

How to add more swap space as a swapfile on RHEL or CentOS 7 What is swap? Swap space on a disk is used when the amount of physical RAM is full in the Linux system. When the system runs out of RAM, inactive pages are moved from the RAM to the swap space. Swap space can be either a dedicated swap partition or a swap file. So here we will see how you can add more swap space as a swap file. In this article we will see how we can add more swap space using a swapfile. Steps : Let's check how much swap is available on the system currently: [root@localhost ~]# swapon --show NAME      TYPE      SIZE USED PRIO /dev/dm-1 partition 3.9G    0B   -2 [root@localhost ~]# free -h               total        used        free      shared  buff/cache   available Mem:           3.7G        414M        1.1G         14M        2.2G        3.0G Swap:           3.9G           0B        3.9G Step 1 : Create a swapfile, which can be used as swap memory: [root@localhost ~]# dd if=/d

Monitoring Memory, CPU and swap on RHEL or CentOS 7

Image
top : The top provides a dynamic real-time view of running processes, CPU, Memory and SWAP utilization on a system. It can display system summary information as well as a list of processes or threads currently being managed by the Linux kernel. [root@localhost ~]# top In case as a root you want to check it for some particular user then : [root@localhost ~]# top -u hpe pmap : This command report memory map of a process or processes. [root@localhost ~]# pmap -d 22745 vmstat : This command reports information about processes, memory, paging, block IO, traps, disks and cpu activity. [root@localhost ~]# vmstat -w [root@localhost ~]# vmstat -as [root@localhost ~]# vmstat -dw [root@localhost ~]# vmstat -D             5 disks             2 partitions         48470 total reads           104 merged reads       9879363 read sectors       6320494 milli reading         57453 writes         39762 merged writes      4